Wear the transmitter to measure heart rate.
Moisten the electrode areas of the strap under running water and make sure that they are well moistened.
Attach the connector to the strap. Position the connector's letter L to the word LEFT on the strap and snap the fastener. Adjust the strap length to fit snugly and comfortably. Secure the strap around your chest, just below the chest muscles, and snap the second fastener.
Check that the wet electrode areas are firmly against your skin and that the Polar logo of the connector is in a central, upright position.
To detach the connector from the strap, apply pressure with your thumb and forefinger and turn your hand as indicated in the picture.
The Polar WearLink transmitter can be used with specific apparel that has built-in soft textile electrodes. Wet the electrode areas of the apparel. Clip the connector of the transmitter straight onto the apparel without the strap so that connector’s Polar logo is in an upright position.

Before using the foot pod* for the first time, insert the battery (included in the product package).
Undo the flap and detach the foot pod from the fork.
Remove the black top cover by lifting it with the front edge of the fork (see picture 1).
Open the battery cover carefully. Pull out the battery case (see picture 2). Insert the battery (AAA) inside the battery case.
Insert the battery case back inside the cover. Make sure that the case slides into the sensor grooves. Be careful not to touch the switch on the foot pod* while sliding the battery case.
Make sure the sealing ring is in the groove, to ensure water resistance. Close the battery cover and place the black top cover on the foot pod. Make sure it is secured.
The green light should start to flash after you press and hold the red button on the foot pod. Press and hold the red button again to turn the foot pod off.
The battery should be properly disposed of according to local regulations.
To measure speed/pace and distance accurately, make sure the foot pod is correctly positioned.
Undo the flap and detach the foot pod from the fork.
Loosen your shoelaces and place the fork underneath them, on top of the tongue of the shoe. Tighten the laces.
Fit the front part of the foot pod (closest to the red button) to the fork and press from the rear end. Fasten the flap. Make sure the foot pod does not move and is aligned with your foot. The more secure the sensor, the more accurately speed and distance are measured.
Turn the foot pod on before exercising. Press and hold the red button on the foot pod until the green light starts flashing.
After exercising, turn the foot pod off by pressing and holding the red button until the green light switches off.
Optional calibration of the foot pod can improve the accuracy of speed, pace and distance measurements. For further information, see Calibrate the Foot Pod.

*Optional S1 foot pod required.
Optional calibration of the foot pod improves accuracy of speed, pace, and distance* measurements. It is recommended that you calibrate the foot pod before using it for the first time, if there are significant changes in your running style, or if the position of the foot pod on the shoe is dramatically changed (e.g. if you have new running shoes). You can calibrate the foot pod by running a known distance, or by setting the calibration factor manually.
You can calibrate the foot pod at any phase of your exercise with lap distance correction, provided you are not exercising with distance-based targets. Just run a known distance, preferably more than 1000 meters.
Make sure the foot pod function in the running computer is on:
Select Settings > Features > Footpod
In the time mode press twice, then start running.
You can calibrate the foot pod during any lap of the run. When you are in a starting point of a known lap distance, press and start running. When you have run the whole lap distance, calibrate by choosing either alternative:
Stop running, stand still, and press and hold to go to Settings. Or,
Stop running, stand still, and press once. Select Settings.
Select Calibrate > Correct lap > Set true lap distance. Fix the displayed lap distance with the distance you just run, and press .
Calibration complete and the factor are displayed. The foot pod is now calibrated and ready for action.
The calibration factor is calculated as a ratio of the actual distance to the uncalibrated distance. Example: you run 1200m, the running computer shows a distance of 1180m, the calibration factor is 1.000. To calculate the new calibration factor as follows: 1.000*1200/1180 = 1.017. The measuring range for the factor is 0.500-1.500.
There are four options for setting the calibration factor:
Before exercise.
Select Settings > Features > Footpod > Calibrate.
Set the Calibration factor and press . The foot pod is now calibrated.
After starting heart rate measurement and before exercise recording.
In the time mode, select > Settings > Footpod > Calibrate.
Set the Calibration factor and press . The foot pod is now calibrated, and you can start exercise recording by pressing .
During exercise by pausing exercise recording.
Start exercising by pressing twice in the time display. Press once and the exercise recording is paused.
Select Settings > Calibrate > Set factor.
Set the Calibration factor and press . The foot pod is now calibrated. Continue exercise recording by pressing .
During exercise without pausing exercise recording.
Start exercising by pressing twice in the time display. Press and hold to get to Settings.
Select Calibrate > Set factor.
Set the Calibration factor and press . The foot pod is now calibrated. Continue running.
If message Footpod calibration failed is displayed the foot pod has not been calibrated and you need to try again.
*Optional S1 foot pod required.
You can utilize the installed ready-made exercises or create new ones on your running computer. You can also create more versatile exercises and transfer them to your running computer by using Polar ProTrainer 5 .
Select Settings > Exercise
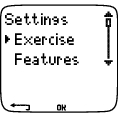
The Exercise menu shows a list of exercises. Navigate through the options with or and view the exercise by pressing .
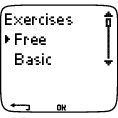
Free: Free exercise with no preset settings.
Basic: Basic training with moderate intensity. Duration around 45 min.
Interval: Basic interval training. Exercise starts with a 15-minute warm-up, followed by a 1km interval and a 3-minute recovery period, repeated 5 times. The session ends with a 15-minute cool-down.
OwnZone: Basic OwnZone-based exercise with moderate intensity. Suggested duration 45 minutes. The running computer is able to determine your individual aerobic (cardiovascular) heart rate zone automatically. This is called OwnZone. For further information, see Determine Your OwnZone. Additional background information can be found in OwnZone Training.
Add new: Create and save your own basic exercise. You can store a total of 10 exercises + 1 Free exercise in your running computer.
After selecting the exercise, the following options are displayed. Select the desired option and press .
Select the exercise as a default exercise. The next time you train, your running computer will offer this exercise as a default.
View the exercise settings. Scroll or to view:
Basic exercise with 1-3 exercise zones: target heart rate or speed/pace* limits for each zone, timer/distance* for the zone, or
Exercise created with the software: name, description, target exercise time. (Press and hold to view the exercise phases and chosen sport profile.)
Edit Basic or OwnZone exercise to fit your needs. You can also edit exercise created with the running computer. For further information, see Create New Exercises. If you have created exercise with the software that includes phases, you cannot edit them with the running computer.
Rename Basic, Interval or other exercise created with the running computer.
Default - Return to default settings of Basic, Interval or OwnZone exercise.
Delete exercise you have created using the running computer or the software.
Create a New Exercise with Zones
Create your own exercises with the running computer. You can create more diversified exercises by using Polar ProTrainer 5. For further information, see software help.
Select Settings > Exercises > Add new
Set the Number of zones for the exercise (0-3) and press . For 0 zones, go to section Create a new exercise without zones.
Choose Zone type:
A. heart rate zones
B. speed/pace* zones
Press . Continue according to your choice.
A. For heart rate zones, select sport zones, or manual heart rate zones. Press .
Sport zone: Select one of the sport zones (e.g. Z1: 50-59%) for your exercise. Press .
Polar sport zones are heart rate intensity areas expressed as percentages of your maximum heart rate. Five different sport zones are set in the running computer as a default: very light (50-59% HRmax), light (60-69% HRmax), moderate (70-79% HRmax), hard (80-89% HRmax), and maximum (90-99% HRmax). Default HRmax value is usually age-based, but if you know your aerobic and anaerobic thresholds, have had your predicted maximum heart rate (HRmax-p) measured in a Polar Fitness TestTM, tested your maximum heart rate yourself or in a lab, then you can define sport zones to better suit your training needs.
Manual: Set the high and low zone limits as bpm or HR% / HRR% and press .
Continue to step 3.
B. If you selected speed/pace* zones, set the high and low zone limits. Press .
Continue to step 3.
3. Set Zone guide to change zone after a specified time or distance*. During your workout, the running computer will alert you when changing zones.
Timers: Set timer for the zone (minutes and seconds) and press . Or
Distances*: Set distance for the zone and press . Or
Off: Set timers and distances* off and press .
Once you have defined the first zone, Zone 1 OK is displayed. For more than 1 exercise zone, repeat steps 2 and 3 until all zones are defined.
When the exercise is ready, New exercise added is displayed. The new exercise (NewExe) is stored in the Exercises menu, where you can select it during your next workout. Rename the exercise by selecting Rename from the list.
Create a New Exercise without Zones
If you create a new exercise without zones, you can use timers or distances* to guide your training.
Select Settings > Exercises > Add new.
Number of zones: Set the number of zones to 0.
Guide type: Choose to sound a timer during workout (reminding you to drink, for example), or set a distance* (for following lap times without recording them).
Timers
Number of timers: Choose the number of timers (1-3) for the session. Press .
Timer 1: Define minutes and seconds for the timer and press . Or
Distances*
Number of distances: Choose the number of distances (1-3) for the session. Press .
Distance 1: Enter the distance(s) and press .
Repeat step 2 until you have defined timers or distances*. When the exercise is ready, New exercise added is displayed. The new exercise (NewExe) is stored in the Exercises menu, where you can select it during your next workout. Rename the exercise by selecting Rename from the list.
*Optional S1 foot pod required.