To get your Polar Loop into use, you'll need a computer with internet connection to access the Polar Flow web service. That's where you'll take it into use.
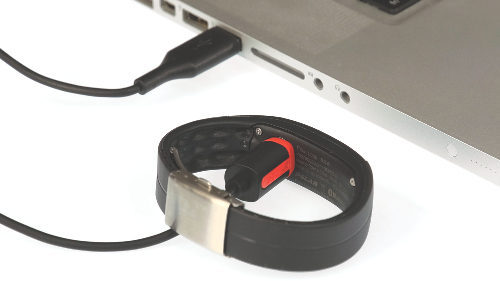
↑ Back to topPlug in your Polar Loop to your computer's USB port with the custom USB cable to wake it up. The Polar-branded magnetic end of the cable snaps into place when it's properly connected to your bracelet. Let your computer install any USB drivers if it suggests so.
You need to download and install the Polar FlowSync software to set up your Polar Loop and to keep your activity data synced.
Go to flow.polar.com/start and download Polar FlowSync.
Open the installation package and follow on-screen instructions.
If you get a pop-up suggesting to restart your computer, you can cancel it and continue.
Once FlowSync installation is complete the Polar Flow web service opens automatically to your internet browser.
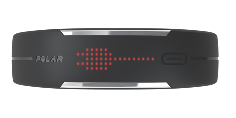
Polar Loop display will start showing the syncing sign.

Unplug and plug your Polar Loop again if Polar FlowSync doesn't recognize it.
Avoid using USB hubs. They may not provide enough power to charge the activity tracker.
Create a Polar account or sign in if you already have one.
Polar account is your ticket to all the Polar services out there for which you need to sign in: the Polar Flow web service, polarpersonaltrainer.com and the discussion forum.
Select settings for your Polar Loop:
Fill in your physical details. They make it possible to get personal guidance and accurate interpretation of your daily activity and training sessions.
Select the time format you'd like to see on the Polar Loop display. You can also select the display orientation by choosing the wrist you'll be wearing the bracelet.
We recommend wearing the bracelet on your non-dominant hand to get the most accurate results.
You can edit your settings any time at the Polar Flow web service and the mobile app.
Start synchronization by clicking Done and the settings will be synchronized between the bracelet and the service.
When finished, the Polar Loop display will show a check mark and will change to charging symbol as it charges.


Now, you can either charge your Polar Loop till it's full or unplug it and start customizing the bracelet size. You can also start using your Polar Loop right away if you want as long as you remember to charge it full later.
Follow these steps to make Polar Loop your own by adjusting it to your wrist size.
Open the buckle by pressing the buckle side buttons.

Detach the buckle from both ends.
Take the buckle tool that came in the box and make the spring bars pop out with it. Then remove the buckle from the bracelet.

Measure your wrist size.
Separate the measuring tool from the getting started guide along the perforated line.
Wrap it around your wrist snugly and take note of the numbers you get. There's one number for both ends. Each number represents the number of blocks between the grooves inside your bracelet you need to take off.

Trim the band carefully from both ends.
To make sure the display will be in the center, it's important that you shorten the band from both ends.
Count as many blocks from one end as the number you measured. Follow the straight line in the groove and between the spring bar holes and then carefully cut the band.
Be careful not to cut into the spring bar holes.
Repeat the action to the other side of the bracelet.

Put the buckle back on.
Take one spring bar and place it inside the first hole at the end of the bracelet and put one end of the spring bar in the buckle’s spring bar hole.
Use the tool to ease the other end of the spring bar inside the other spring bar hole in the buckle.
Do the same on the other end of the band.

Try the band on to see if it fits.
You can adjust the length if needed by moving one of the buckle spring bars to the outer spring bar hole until it fits perfectly. Or, if necessary, trim the band once more by one block at a time.