Wear the heart rate sensor to measure heart rate.
Moisten the electrode area of the strap.
Attach the connector to the strap.
Tie the strap around your chest, just below the chest muscles, and attach the hook to the other end of the strap.
Adjust the strap length to fit tightly but comfortably. Check that the moist electrode areas are firmly against your skin and that the Polar logo of the connector is in a central and upright position.
Detach the connector from the strap and rinse the strap under running water after every use. Sweat and moisture may keep the electrodes wet and the heart rate sensor activated. This will reduce the heart rate sensor battery life. For more detailed washing instructions, see Care and Maintenance.
The Polar H3 heart rate sensor can be used with specific apparel that has built-in soft textile electrodes. Wet the electrode areas of the apparel. Clip the connector of the heart rate sensor straight onto the apparel without the strap so that the connector’s Polar logo is in an upright position.

Wear the heart rate sensor as instructed and start heart rate measurement by pressing .
Within 15 seconds, your heart rate appears on the display.
If you use a sensor, select the shoe or bike by pressing and holding , or in Settings > Shoes/bikes. The number in the lower right hand corner of the display indicates your shoe or bike selection. Stand still and wait until the training computer finds the sensor signal (depending on the sensor you are using, runner, biker or GPS symbol stops flashing).
To quick-change exercise type, press and hold .
Start exercising by pressing .
If the following message is displayed: (Exercise name) requires a speed sensor, your exercise requires a speed sensor to display speed/pace and distance* data (e.g. you have defined speed/pace* zones for the exercise). The training computer returns to exercise type selection menu, where you can select an exercise which does not require a speed sensor.
Alternatively, select Settings, Reset trip or Location.
In Settings you can change or view different settings before exercise. For further information on all the settings available, see 7. Settings. The Settings menu lists the following options:
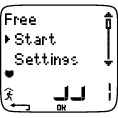
Exercise: Choose an exercise type Free, Basic, Interval, or OwnZone (If you have created new exercises, these will be listed, as well.)
Select: Set a default exercise to be performed at once, or
View: View exercise settings.
Shoes/bikes: Select shoes 1/2/3, bike 1/2/3 or none. Only shoes/bikes that you have activated in Settings > Features > Shoes/bikes are listed.
If you select a shoe or bike, and have also set the GPS function on, the GPS will only be used for location and route tracking.
GPS: Set the GPS function On/Off.
Altitude: Switch the altitude on or off, or calibrate altitude.
Rec.rate: Set the recording rate.
RR data: Switch the RR recording on or off.
TZ Alarm: Switch target zone alarm sounds on or off.
HR view: Choose to view heart rate in beats per minute (bpm), as a percentage of maximum heart rate (HR%), or as a percentage of heart rate reserve (HRR%).
Speed view: Choose to view speed* in kilometers or miles per hour (km/h or mph), or in minutes per kilometer or mile (min/km or min/mi).
A.Lap: Switch the automatic lap function on or off.
Display: Modify the display (for further information, see Personalize the Training Computer Display).
In Reset trip you can reset the trip distance before starting an exercise session.
In Location** you can check your current location. The training computer will pinpoint your location using the latest GPS coordinates. Latitude and longitude are expressed in degrees and minutes. Number of satellites visible on lowest row.
To further analyze the track information, transfer the data to Polar ProTrainer 5. See Software help for instructions.
*Optional s3/s3+ stride sensor, G3/G5 GPS sensor or cycling speed sensor W.I.N.D. required.
**Optional G3/G5 GPS sensor W.I.N.D. required.
↑ Back to topThe RS800CX training computer offers you the option of combining consecutive exercises. When you start a new exercise session within an hour of the previous one, Combine exercises? is displayed.
To combine, select . The multisport exercise view is displayed during training. A maximum of ten exercises can be combined. For more information see Information on the Display.
By using Polar ProTrainer 5 software, you can combine exercises after training and analyze them further. For more, see Polar ProTrainer 5 help.
Your training computer offers you a simultaneous view of three different lines of exercise information. By pressing or , you can view different displays. The name of the display appears for a few seconds. The name indicates the lower row information. The display varies depending on the sensors you have installed, which features are set On and what kind of exercise you are performing.
Customize the training computer display easily with Polar ProTrainer 5 software.
Default displays while exercising:
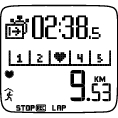
 | Heart rate view Speed/pace* / Calories Stopwatch Heart rate * s3/s3+ stride sensor, G3/G5 GPS sensor or cycling speed sensor W.I.N.D. required. |
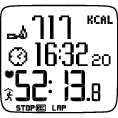 | Stopwatch view Calories Time Stopwatch * s3/s3+ stride sensor, G3/G5 GPS sensor or cycling speed sensor W.I.N.D. required. |
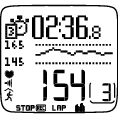
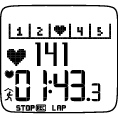 | Lap time view Zone pointer Heart rate Lap time |
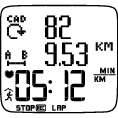 | Speed/pace view Cadence* Distance** Speed/pace** * s3/s3+ stride sensor or cadence sensor W.I.N.D. required. * s3/s3+ stride sensor, G3/G5 GPS sensor or cycling speed sensor W.I.N.D. required. |
 | Distance view Countdown timer Zone pointer Distance* / Lap time * s3/s3+ stride sensor, G3/G5 GPS sensor or cycling speed sensor W.I.N.D. required. |
 | Altitude view Heart rate Ascent Altitude |
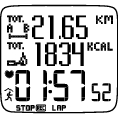 | Multi-sport view (displayed only if you have combined the current exercise with the previous exercise file) Total duration of combined exercise Total calories of combined exercise Total distance of combined exercise* * s3/s3+ stride sensor, G3/G5 GPS sensor or cycling speed sensor W.I.N.D. required. |
 | Exercise created with Polar ProTrainer 5 If you have downloaded a program from the software, you can see the details of your exercise session on a separate display. For further information, see Perform Programmed Exercise. You cannot modify this display using the training computer. |
Personalize your training computer display to show the information you want to see during training, either by using the training computer or the software. A programmed exercise downloaded from the software and a training view have their own displays that cannot be modified.
In time mode, select > Settings > Display > Edit
Select the display you want to change by pressing or , and press . Set the information for the blinking upper row with or , and press . The information available depends on the features that are activated. For further information, see Feature Settings.
Repeat the same to change the middle and lower rows. Each display is named after the information shown on the lower row. To return the default settings of the display, press and hold when the rows are blinking.
Activate Titles to view help texts while changing displays during exercise: In time mode, select > Settings > Display > Titles
| Information on the display | Symbol | Explanation |
|---|---|---|
| Time of day |  | Time of day |
| Countd. timer |  | Countdown timer |
| Lap time |  | Lap number and lap time |
| Stopwatch |  | Total duration of the exercise so far |
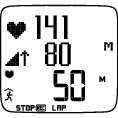
| Heart rate |  | Current heart rate |
| Average heart rate |  | Average heart rate of the exercise so far. |
| Calories |  | Expended calories / Expended calories per hour |
| Zone pointer (heart rate) |  | If the heart symbol is not visible and/or an alarm sounds, your heart rate is outside the target zone. |
| Zone pointer (Polar sport zones) |  | Target zone indicator with a heart symbol that moves left or right on the sport zone scale according to your heart rate. For further information on setting a sport zone, see Button Functions During Exercise. |
| Target zone | 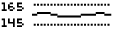 | A graph showing your actual heart rate compared to the set heart rate zones. |
| RR variation |  | Beat to beat variation in heart beat intervals, i.e. the variation in times between successive heart beats. |
| Ascent |  | Ascended meters/feet |
| Descent |  | Descended meters/feet |
| Altitude |  | Current altitude |
| Time in zone |  | Time spent in the zone |
| Temperature |  | Temperature reading (°C). Because your body temperature affects the actual temperature reading, the best way to obtain an accurate temperature is to take your wrist unit off for at least 10 minutes. |
| Information on the display (Polar s3/s3+ sensor W.I.N.D. required) | Symbol | Explanation |
|---|---|---|
| Speed/pace |  | Current speed/pace |
| Max speed |  | Maximum speed/pace so far |
| Average speed |  | Average speed/pace so far |
| Distance |  | Distance covered so far |
| Lap distance |  | Lap number and lap distance |
| Trip distance |  | Distance between points A and B. |
| Zone pointer (speed/pace) |  | If the symbol is not visible and/or an alarm sounds, your speed/pace is outside the target zone. |
| Cadence |  | Running cadence (pair of steps per minute) |
| Avg Cadence |  | The average running cadence so far (pair of steps per minute) |
| Zone pointer*(cadence) |  | If the cadence symbol is not visible and/or an alarm sounds, you are outside the target cadence zone limits. |
| Information on the display (Polar G3/G5 GPS sensor W.I.N.D. required) | Symbol | Explanation |
|---|---|---|
| Speed/pace |  | Current speed/pace. The amount of bars above the letter G indicates the GPS signal strength. |
| Max speed |  | Maximum speed/pace so far |
| Average speed | | Average speed/pace so far |
| Distance | | Distance covered so far |
| Lap distance | | Lap number and lap distance |
| Trip distance | | Distance between points A and B. |
| Zone pointer (speed/pace) | | If the symbol is not visible and/or an alarm sounds, your speed/pace is outside the target zone. |
| Information on the display (Polar speed sensor W.I.N.D required) | Symbol | Explanation |
|---|---|---|
| Bike speed |  | Speed you are currently cycling at |
Distance | | Distance cycled |
| Lap distance* | | Lap number and lap distance |
| Trip distance | | Distance between points A and B. |
| Max speed |  | The maximum speed so far. |
| Avg speed |  | The average speed so far. |
| Inclinometer |  | Uphill/downhill steepness in percentages and grades. Estimates uphill or downhill inclination in numerical form, helping you to adjust cycling effort accordingly. |
| Information on the display (Polar cadence sensor W.I.N.D required) | Symbol | Explanation |
|---|---|---|
| Cadence | | Measures the speed at which you turn the cranks of your bicycle (i.e. cadence), in revolutions per minute (rpm). |
| Avg Cadence | | The average cadence. |
| Zone pointer*(cadence) | | If the cadence symbol is not visible and/or an alarm sounds, you are outside the target cadence zone limits. |
 | Press to record a lap. The display will show: Lap number Average heart rate of the lap Lap time |
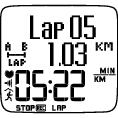 | If a speed sensor* is activated, the following will also appear: Lap number Lap distance Average speed/pace of the lap |
When training without preset target zones, you can lock your heart rate to the current sport zone. This way, if you did not preset target zones before starting the exercise, you can do it on-the-go during a session.
To lock/unlock the zone, press and hold .
During programmed exercises: Press and hold and select Lock zone/Unlock zone from the Lap menu.
If, for example, you are running with a heart rate of 130 bpm which is 75% of your maximum heart rate, and matches sport zone 3, you can press and hold to lock your heart rate into this zone. Sport zone3 Locked 70%-79% is displayed. An alarm sounds if you are below or above the sport zone (if the target zone alarm function is on). Unlock the sport zone by pressing and holding again: Sport zone3 Unlocked is displayed.
Using the software, you can also base ZoneLock on your speed/pace or cadence*. For further information, see software help.
*Optional sensor required.

Press and hold to zoom into the upper row, and to zoom into the middle row. Return to the normal display by pressing and holding the buttons again.
To illuminate your display, press during the exercise. Night mode is turned on, and the display illuminates automatically when any button is pressed or exercise phase is changed.
Press and hold . Settings is displayed. You can change certain settings without pausing the exercise recording. The contents of this menu vary according to exercise type. For further information, see Settings.
Prev. phase: View summary information of the previous phase or repetition (displayed when an exercise with phases is created in the software).
Keylock: Lock/unlock buttons to prevent accidental button presses.
TZ Alarm: Turn target zone alarm sound on/off.
Change zone: Switch target zones (displayed when you have defined multiple target zones, except when an exercise with phases is created with the software).
HR view: Select heart rate format.
Speed view: Select km/h or min/km.
Calibrate: Calibrate stride sensor* (not displayed if stride sensor is off).
Seek sensor: Searches for heart rate sensor or sensor data, if the signal disappears during exercise due to interference.
A.Lap*: Activate/deactivate automatic lap.
Once you have changed the settings, the training computer will return to exercise mode.
Pause exercise recording by pressing .
In pause mode you can:
Continue: Continue exercise recording.
Exit: Stop exercise recording (or press STOP).
Summary: View a summary of the exercise so far. The following summary information is displayed: calories, distance*, exercise time, maximum heart rate, minimum heart rate, average heart rate, maximum speed/pace*, average speed/pace*, ascent and altitude.
Combine: Combine your current exercise with the previous exercise file.
Settings: Change or view different settings.
Reset: Delete recorded exercise information. Confirm with and press again to restart recording.
Reset trip: Reset a trip distance. Confirm with and press again to restart recording.
Location**: Check your current location. The training computer presents the location with the latest GPS coordinate data. Latitude and longitude are expressed in degrees and minutes. Number of visible satellites visible on lowest row.
Free mode: Change your exercise profile to free exercise mode. This does not delete the exercise you have performed, but will continue the exercise without settings. Restart the original exercise by pausing the session, and choosing Restart P1.
**Optional G3/G5 GPS sensor W.I.N.D. required.
For background information on Polar OwnZone®, see OwnZone Training.
Find your OwnZone in 1-5 minutes during a warm-up period by walking and jogging. You should start exercising gently at a light intensity and gradually increase intensity to raise your heart rate.
Redefine your OwnZone:
When changing exercise environment or exercise mode.
When taking up exercise after more than a week’s break.
If you are not 100 percent sure of your physical or mental state – for example, if you are not recovered from previous training, not feeling well, or are stressed.
After changing user settings.
Before you start to determine your OwnZone, make sure that:
Your user settings are correct.
You select the OwnZone exercise. Every time you start the OwnZone exercise, the training computer will automatically determine your OwnZone.
Wear the heart rate sensor and stride sensor* as instructed. Start measurement by pressing twice.
When your exercise starts, OZ is displayed and OwnZone determination begins.
Determination of your OwnZone happens in five stages. After each stage, you will hear a beep (if the sound settings are on) indicating the end of the stage.
OZ > Walk at a slow pace for 1 min. Keep your heart rate below 100 bpm / 50% HRmax during this first stage.
OZ >> Walk at a normal pace for 1 min. Slowly increase your heart rate by 10-20 bpm / 5% HRmax.
OZ >>> Walk at a brisk pace for 1 min. Increase your heart rate by 10-20 bpm / 5% HRmax.
OZ >>>> Jog at a slow pace for 1 min. Increase your heart rate by 10-20 bpm / 5% HRmax.
OZ >>>>> Jog at a brisk pace or run for 1 min. Increase your heart rate by approximately 10 bpm/ 5 % HRmax.
At some point during the session, you will hear two consecutive beeps. This means your OwnZone has been determined.
If determination was successful, OwnZone Updated and the zone are displayed. The zone is displayed in beats per minute (bpm), as a percentage of maximum heart rate (HR%), or as a percentage of your heart rate reserve (HRR%) depending on your settings.
If OwnZone determination was not successful, your previously determined OwnZone will be used and OwnZone Limits is displayed. If OwnZone has not previously been recorded, age-based limits are automatically applied.
You can now continue with your exercise. Try to keep inside the given heart rate zone to maximize exercise benefits.
Alternatively, to skip OwnZone determination and use the previously determined OwnZone, press OK at any phase of the process.
The elapsed time used for OwnZone determination is included in your exercise recording time.