Wear the heart rate sensor to measure heart rate.
Detach the connector from the strap after every use, to maximize the battery lifetime. Sweat and moisture may keep the electrodes wet and the heart rate sensor activated. This will reduce the battery life. For more detailed washing instructions, see 12. Important Information. |
 |
For video tutorials, go to http://www.polar.com/en/polar_community/videos.
↑ Back to topWear the heart rate sensor and make sure you have set up an optional sensor* as instructed in the sensor's user manual. If you are using a speed, cadence, or stride sensor for the first time, see 10. New Accessory. To use Polar ZoneOptimizer feature for your training session, see Train with Polar ZoneOptimizer.
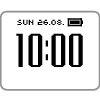
1. Start by pressing | |
|---|---|
 |
|
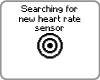
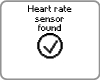
2. Pair the heart rate sensor with the training computer (pairing is performed only once) | |
|---|---|
Pairing ensures that your training computer receives signal from your heart rate sensor only and enables interference-free training when there are other training computers around. If you purchased a set which does not include a heart rate sensor, and you have set the heart rate sensor off in the Sport Profile settings, skip step two and go straight to step three. | |
 |
|
 |
|
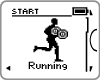
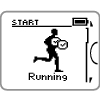
3. Select the sport profile | |
|---|---|
 |
|
 |
|
4. The training computer searches the GPS satellite signals / sensor signals | |
|---|---|
|
|
| |
 |
|

5. Start recording the training session | |
|---|---|
 |
|
Before you start recording a training session, make sure that the training computer has found the GPS satellites signals / sensor signals. This ensures that
| |
*Optional sensors include Polar s3+ stride sensor, Polar CS speed sensor W.I.N.D. or Polar CS cadence sensor W.I.N.D.
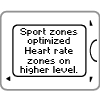
↑ Back to topThe ZoneOptimizer function determines your personalized sport zones (heart rate zones) for your aerobic training session. It measures your heart rate variability during the warm-up and determines your personal sport zones. For more information, see Polar ZoneOptimizer.
To use the ZoneOptimizer function in your training, set in on by selecting MENU > Settings > Heart rate settings > ZoneOptimizer > On .
The ZoneOptimizer function defines the personalized target heart rate zones for you in the beginning of every training session. If there is less than an hour since your last ZoneOptimizer definition, the given target heart rate zones are not necessarily valid, because you may have not recovered from previous training, and during instant recovery, heart rate variability returns to normal state slower than heart rate.
Before ZoneOptimizer determination, make sure that you have the Polar default sport zone heart rate limits in use i.e. you have not modified the heart rate limits manually. If you want to modify the Sport Zone heart rate limits manually, set the ZoneOptimizer function off.
To set the ZoneOptimizer function on, select MENU > Settings > Heart rate settings > ZoneOptimizer > On.
The ZoneOptimizer determination will start in the background already when you are in pre-training mode. When you see the ECG-curve on the top right hand corner on the display, you will know that the heart rate measurement and ZoneOptimizer are on.
 |
|
 |
|
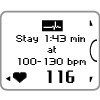 |
If you have a very low HRmax, the training computer will give you special limits. The alarm will sound when the second part of the ZoneOptimizer determination is finished. The ZoneOptimizer determination may already finish here, if the heart rate variation limit is reached . |
 |
|
 |
|
You can view the training data in different training views by pressing or . The number of the training view appears for a few seconds.
The data displayed varies depending on the sensors you have installed, which features are set on and what kind of sport you are performing.
The below tables present available training views for some different sensor combinations. In these examples, the training data is shown on three rows. You can set the training data to be shown on two or three rows in MENU > Settings > Sport profiles > Sport > Training view.
Heart rate sensor | Heart rate sensor GPS function on | Heart rate sensor s3+ stride sensor* | |||
|---|---|---|---|---|---|
 | HEART RATE | | HEART RATE | 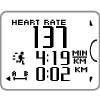 | HEART RATE |
 | ZONEPOINTER | 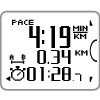 | SPEED/PACE | | SPEED/PACE |
 | CALORIES | | ZONEPOINTER | | ZONEPOINTER |
 | SPORT ZONES Time in each zone | 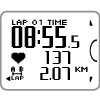 | LAP 01 TIME | | LAP 01 TIME |
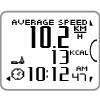
 | AVERAGE SPEED/PACE Average Speed/Pace | | AVERAGE SPEED/PACE Average Speed/Pace | ||
| SPORT ZONES Time in each zone | | SPORT ZONES Time on each zone | ||
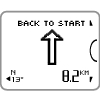 | BACK TO START An arrow points the direction of your starting point. For more information, see Back to Starting Point | ||||
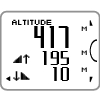 | ALTITUDE | ||||
When using the training computer with s3+ stride sensor or CS speed sensor W.I.N.D., the training computer retrieves speed and distance data from the sensor. If the GPS function is on, it will only be used for location and route tracking. | |||||
If the altitude reading is --, the training computer has not found enough GPS satellite signals. To calculate the altitude, the training computer requires a minimum of six satellite signals. Something in your surroundings may be blocking satellite signal reception (e.g. underpasses, tall buildings, terrain or forested areas). | |||||
Heart rate sensor CS speed sensor W.I.N.D.* | Heart rate sensor CS cadence sensor W.I.N.D. | Heart rate sensor CS cadence sensor W.I.N.D. GPS function on | |||
|---|---|---|---|---|---|
 | HEART RATE | 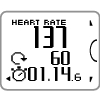 | HEART RATE | | HEART RATE |
 | SPEED/PACE |  | CADENCE | | SPEED/PACE |
| ZONEPOINTER | | ZONEPOINTER | | ZONEPOINTER |
 | LAP 01 TIME | 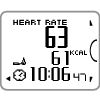 | HEART RATE | | LAP 01 TIME |
 | AVERAGE SPEED/PACE Average speed/pace | | SPORT ZONES Time in each zone | | AVERAGE SPEED/PACE Average speed/pace |
| SPORT ZONES Time in each zone | 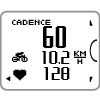 | CADENCE | ||
| SPORT ZONES Time on each zone | ||||
| BACK TO START An arrow points the direction of your starting point. For more information, see Back to Starting Point | ||||
| ALTITUDE | ||||
If the altitude reading is --, the training computer has not found enough GPS satellite signals. To calculate the altitude, the training computer requires a minimum of six satellite signals. Something in your surroundings may be blocking satellite signal reception (e.g. underpasses, tall buildings, terrain or forested areas). | |||||
Symbols on the display / Explanation |
|---|
Current altitude |
 Ascended meters/feet |
 Speed at which you turn the cranks of your bicycle |
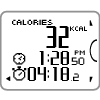
 The expended calories so far. The cumulation of calories starts when your heart rate is displayed. |
 Descended meters/feet |
 Cumulative distance |
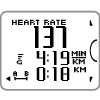
 Total duration of the training session so far |
 Your current heart rate |
 Manual lap distance |
 Manual lap number and lap time |
Current pace (min/km or min/mi) or current speed (km/h or mph)    You can select the speed view in sport profile settings. See Sport Profile Settings for instructions. |
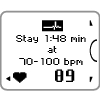
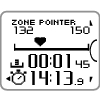
 Target zone indicator with a heart symbol that moves left or right on the sport zone scale according to your heart rate. |
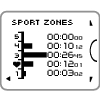
 Time spent in the target zone |
 |
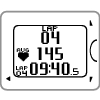 | Press to record a lap. The display will show: Lap number Average heart rate of the lap Lap time |
 | If a speed sensor is activated, the following will also appear: Lap number Average speed/pace of the lap Lap distance |
You can lock/unlock your heart rate to the current sport zone.
To lock/unlock the sport zone, press and hold .
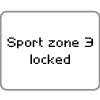 | If, for example, you are running with a heart rate of 130 bpm which is 75% of your maximum heart rate, and matches sport zone 3, you can press and hold to lock your heart rate into this zone. Sport zone3 Lockedis displayed. |
 | An alarm sounds if you are below or above the sport zone. Unlock the sport zone by pressing and holding again: Sport zone3 Unlocked is displayed. |
There is a night mode function in the training computer. Press the button once during pre-training mode, training recording mode or pause mode. The backlight will be activated every time you press any of the buttons.
The display will also light up if a message, for example, Check heart rate sensor, is displayed.
Night mode will be switched off when you finish the training recording.
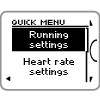
Press and hold . QUICK MENU is displayed. You can change certain settings without pausing the training recording. For further information, see Quick Menu.
To pause training recording, press once. To continue training recording, press .
To stop recording completely, press twice. The following summary of your training information is displayed
Textual feedback, for example Steady state training+, is displayed if you trained at least a total of 10 minutes in the sport zones. See the feedback in more detail in Training Files. For more information, see 6. After Training
Duration and Calories
Average heart rateand Maximum heart rate
Sport zones (Time in each zone)
Average pace and Maximum pace or Average speed and Maximum speed (visible if the GPS function is on or s3+ stride sensor/CS speed sensor is in use)
Distance (visible if the GPS function is on or s3+ stride sensor/CS speed sensor is in use) and Running Index (visible if the GPS function is on or s3+ stride sensor is in use)
Care for your heart rate sensor after training. Detach the connector from the strap and rinse the strap under running water after every use. For complete care and maintenance instructions, see Caring for Your Product.
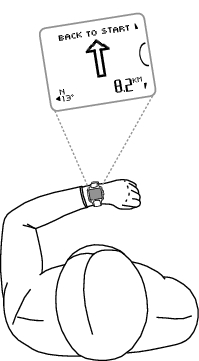
The Back to starting point feature guides your way back to the starting point. When the training computer finds the GPS satellite signals in the beginning of the training session, your location is saved as a starting point.
When it is time to return to your starting point, do the following:
 |
|
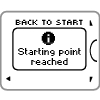 | When you reach the starting point, Starting point reached is displayed. |
Always keep a map at hand in case the RC3 GPS loses the satellite signal or the battery runs out.
This feature uses the GPS function. Set GPS function on in Sport Profile Settings.