Start a training session
- Wear your watch and tighten the wristband.
- To enter the pre-training mode, press and hold OK in time view or press BACK to enter the main menu and choose Start training.
- First choose the sport profile you want to use.
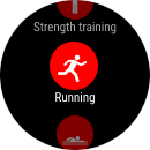
Browse to the sport profile you want to use and confirm your selection with OK
-
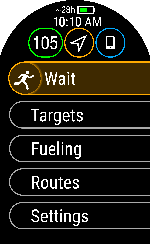
Then, choose the settings for your training session.
-
In Targets, you'll find training targets that you have saved as favorites in Flow and synced to your watch, as well as your daily FitSpark training suggestions. Choose the favorite training target or FitSpark training suggestion you want to perform. After making your choice, the watch returns to pre-training mode, where you can start the training session. For more information, see Favorites and FitSpark™ daily training guide.
-
In Fueling, you can add three types of reminders to help you to refuel and maintain adequate energy levels during your long sessions: Smart carbs reminder, Manual carbs reminder and Drink reminder. For more information see FuelWise™.
-
In Routes, you'll find the routes you have saved as favorites in the analysis view of your training session in the Flow web service and synced to your watch. Komoot routes are also shown here. Choose a route from the list, then select where you want to start: Start point (original direction), Mid-route (original direction), End point to reverse direction or Mid-route to reverse direction. For more information, see Route Guidance.
-
In Settings, you'll find additional training settings. The options displayed depend on the sport you have chosen and whether you are using GPS. You can, for example, add timers to your training views. Power save options are also set here. After making your choice, return to pre-training mode by pressing the BACK button. For more information, see Training settings.
-
- Stay in the pre-training mode until the watch has found your heart rate and the GPS satellite signals (if applicable to your sport) to make sure your training data is accurate. If you have paired an optional Bluetooth sensor with your watch, the watch will automatically start searching for the sensor signal as well.
-
Tighten the wristband firmly around your wrist. The sensor on the back must be in constant touch with your skin and the device should not be able to move on your arm. Movement between the watch and your skin can interfere with the readings.
-
In cold conditions, blood circulation in the skin may be too weak for the watch to obtain an accurate heart rate reading. Warming up before you start your session to increase heart rate and blood flow can help improve measurement.
-
Try wearing the watch on your other wrist to see if that helps.
-
Make sure the optical sensor area on the back of the watch is clean. Dirt can reduce measurement performance. You can wash the watch under running water using a mild soap and water solution.
-
Slide the watch slightly further up from the wrist bone.
-
Tighten the wristband slightly to reduce movement during activity.
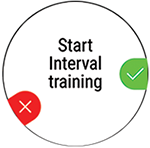
- When all signals are found, press OK to start training recording.
Heart rate
When the watch is searching for your heart rate, a heart icon is displayed inside the circle. Once the watch detects your heart rate, the heart icon is replaced by the current heart rate reading. After the heart rate reading appears, allow some time for the signal quality to reach its optimal level. The color of the circle around the heart rate reading indicates the current signal quality.
|
|
When the circle around the heart rate reading is red, the watch is measuring your heart rate, but movement or interference is affecting the signal. To improve performance: |
|
|
When the circle around the heart rate reading is orange, the watch is measuring your heart rate with moderate signal strength. Improving fit or reducing movement may enhance accuracy. To improve performance: |
|
|
When the circle around the heart rate reading is green, the watch is measuring your heart rate with good signal strength. |
|
|
If you are wearing a paired Polar heart rate sensor, the watch automatically uses the connected sensor during training sessions. A blue circle indicates that heart rate is being measured using the sensor. |
|
Optical heart rate signal strength may vary between users due to individual differences such as skin characteristics, wrist anatomy, or environmental conditions. Some users may not consistently reach the green or orange signal quality levels. When you are looking for the best possible accuracy during training, consider using a Polar H10 heart rate sensor with a chest strap. |
|
GPS
To catch GPS satellite signals, go outdoors and away from tall buildings and trees. Keep your watch still with the display upwards and avoid touching the watch during the GPS signal search.
If the start button is orange and displays Wait, you should wait a moment until it turns green and displays Start. The GPS will then be ready.
|
|
The circle around the GPS icon will turn orange when the minimum amount of satellites (4) needed for the GPS fix are found. You can start your session but for better accuracy wait until the circle turns green. |

|
The circle around the GPS icon will turn green when the GPS is ready. The watch notifies you with a sound and vibration. |
Connected phone
|
|
Your paired phone is connected and phone notifications, music controls or the voice guidance feature is turned on. |
Battery status

|
Estimated training time with current settings. By using power save settings, the estimated training time can be extended. |
See During Training for more information on what you can do with your watch during training.
Start a planned training session
You can plan your training and create detailed training targets in the Polar Flow app or the Polar Flow web service and sync them to your watch.
To start a planned training session scheduled for the current day:
- Enter the pre-training mode by pressing and holding OK in time view.
- You'll be prompted to start a training target you've scheduled for the day.
- Press OK to view the target information.
- Press OK to return to pre-training mode, and choose the sport profile you want to use.
- When the watch has found all the signals, press OK. Recording started is displayed and you can start training.
Your watch will guide you towards completing your target during training. See During Training for more information.
Your planned training targets will also be included in the FitSpark training suggestions.
Start a Multisport Training Session
Multisport allows you to include multiple sports in one training session, and seamlessly switch between sports without interrupting your training recording. During a multisport training session your transition times between sports are automatically monitored, allowing you to see how long it took you to switch from one sport to another.
There are two different ways to perform a multisport training session: fixed multisport and free multisport. In a fixed multisport (multisport profiles in the Polar sports list) like triathlon, the order of the sports is fixed, and they must be performed in that specific order. In free multisport, you can choose what sports you perform and in which order you perform them by selecting them from the sport list. You can also switch back and forth between sports.
Before starting a multisport training session, make sure that you have set the sport profile settings for each of the sports that you are going to use for the training session. For more information, see Sport profiles in Flow.
- Press BACK to enter the main menu, choose Start training, and then browse to a sport profile. Choose Triathlon, Free multisport or any other multisport profile (can be added in the Flow web service).
- Once your watch has found all the signals, press OK. Recording started is displayed and you can start training.
- To change the sport press BACK to go to transition mode.
- Choose Switch sport, and then choose the next sport. Press OK (your transition time is shown) and continue training.