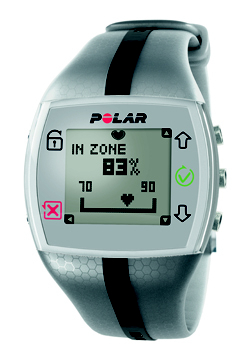
Heart rate monitor records and displays your heart rate and other data during training.
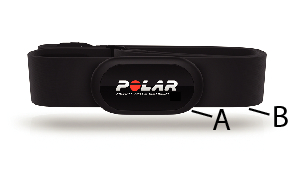
H1 heart rate sensor transmits the heart rate signal to the heart rate monitor. The heart rate sensor consists of a connector (A) and strap (B).
The latest version of this user manual can be downloaded at http://www.polar.com/en/support.
For video tutorials, go to http://www.polar.com/en/polar_community/videos.
Heart rate sensors with Polar specific GymLink technology, e.g. Polar H1 and H2, can be used with compatible gym equipment.

 :
:
Illuminate the display. During exercise press the button once, after this the backlight is lit when pressing any button.
Press and hold to enter the quick menu:
In time view: Lock buttons, set alarm or select time zone.
During exercise: Adjust exercise sounds or lock buttons.
 :
:
Exit the menu and return to the previous level.
Cancel selections and leave settings unchanged.
Press and hold to return to the time view from any view.
Stop recording an exercise.
 : Move through the menu and selection lists, and adjust values.
 :
:
Confirm selections.
Start recording an exercise.
 : Move through the menu and selection lists, and adjust values.
If you do not know where your are in the menu, press and hold the button until the time is displayed.
To activate your Polar Move, press and hold any button for one second. Once the heart rate monitor is activated, it cannot be switched off.
For the training data to be accurate, all user information must be valid.
Before you use the Polar Move for the first time, enter the basic settings.
Before changing the user, enter the correct user information.
Use the and buttons to move through selection lists and to adjust values. Confirm selections with the button.
If you do not have student data available, go through steps 1-6 and skip the User information by pressing and holding the button for two seconds.
Language: Select English, Español, Français, Italiano, Português, Suomi, Svenska or Deutsch.
Please enter basic settings is displayed.
TIME FORM. (time format): Select 24 hours or 12 hours.
TIME: Set the time of day. In the 24 hour format, set Hours first and then Minutes. In the 12 hour format, start by setting AM or PM, and then hours and minutes.
DATE: Set Day, Month, Year. If you select the 12 h format, set Month, Day, Year.
UNITS: Set Imperial units (LBS, FT) or Metric units (KG, CM). By selecting lbs/ft, calories are displayed as Cal, otherwise they are shown as kcal. Calories are measured as kilocalories.
If you skip adjusting the user information, default settings will be used.
Weight: Enter your weight.
Height: Enter your height.
Date of birth: In the 24 hours format, set first Day of birth, in 12 the hours format start with Month of birth.
Sex: Select Female/Male.
Settings OK? is displayed. Press or to select and confirm with the button.
YES: Settings are accepted and saved, and the Polar Move enters the time view.
NO: Start entering the basic settings from the beginning.
In the time view, press and select Settings > User Information. See User Information.