Komoot
Plan detailed routes on maps with komoot and transfer the routes to your watch for turn-by-turn route guidance on the go! Whether road cycling, hiking, bikepacking or mountain biking, komoot’s superior planning and navigation technology allows you to easily discover more of the great outdoors.
Create a komoot account if you don't have one. When you sign up for komoot, you get a free region to test all of their core features. Komoot recommends to unlock your home region as your free region. Then connect komoot to Polar Flow, and get your komoot routes on your watch.
For help using Komoot, see their support site at support.komoot.com/hc/en-us.
Komoot routes require 1 second GPS recording rate. It cannot be used with 1 minute or 2 minute recording rates.
Connect your komoot and Polar Flow accounts
First, make sure you have a polar Flow account and a komoot account. You can connect your komoot and Polar Flow accounts in the Polar Flow app or web service.
In the Flow app:
In the Polar Flow app go to the main menu, and choose General Settings > Connect > Komoot > Connect.
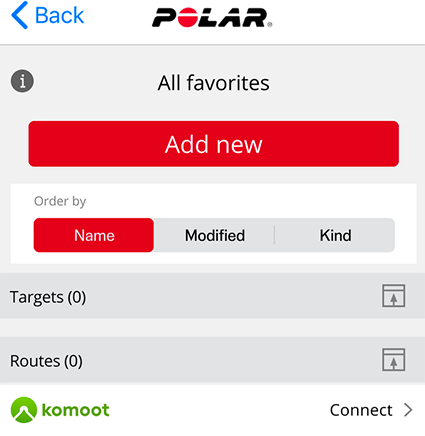
Alternatively, choose Favorites from the main menu, and tap the Komoot button to connect:
In the Flow web service:
In the Polar Flow web service go to Settings > Partners > Komoot > Connect.
Alternatively, go to Favorites by clicking the Favorites icon ![]() on the menu bar, and click Connect:
on the menu bar, and click Connect:

After connecting your komoot and Polar Flow accounts, all of your planned komoot tours that start in a region that you have unlocked in your Komoot account will be synced to your favorites in Flow.
Sync komoot routes to your watch
When you create new routes in komoot, they will be automatically fetched from komoot and synced to both your favorites in Polar Flow and the routes on your watch the next time you sync the watch with the Flow app.
Note that you must sync the routes to your watch using the Polar Flow app. Routes cannot be synced to your watch using the Polar FlowSync software on your computer.
You can choose the routes you want to have on your watch in the Polar Flow app or web service. Your watch can have a maximum of 100 favorites at a time.
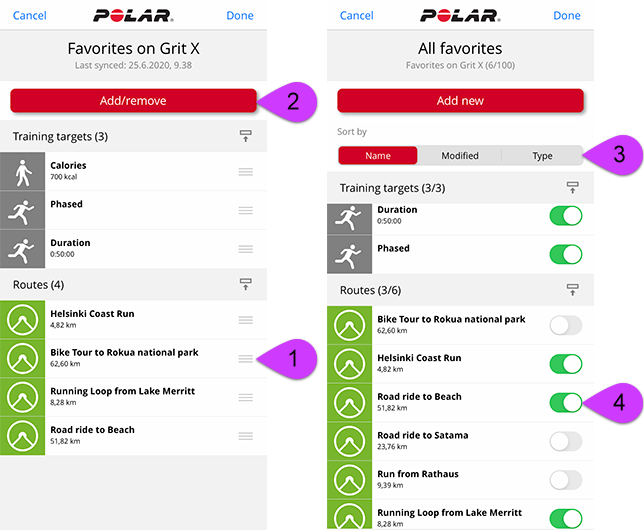
In the Flow app, go to Devices menu and onto the device page. Scroll down the page and tap Add/remove to see your current favorites on the watch.
- You can reorder the routes on the watch by tapping and holding
 (iOS)/
 (Android) on the right and dragging the routes where you want them.
 - To add or remove a route, tap Add/remove again to access all your favorites.
- You can sort the favorites by Name, Modified and Type.
- To remove a route from the watch, turn the switch to left. To add a route, turn the switch to right.
- Sync your watch with the app to save the changes.
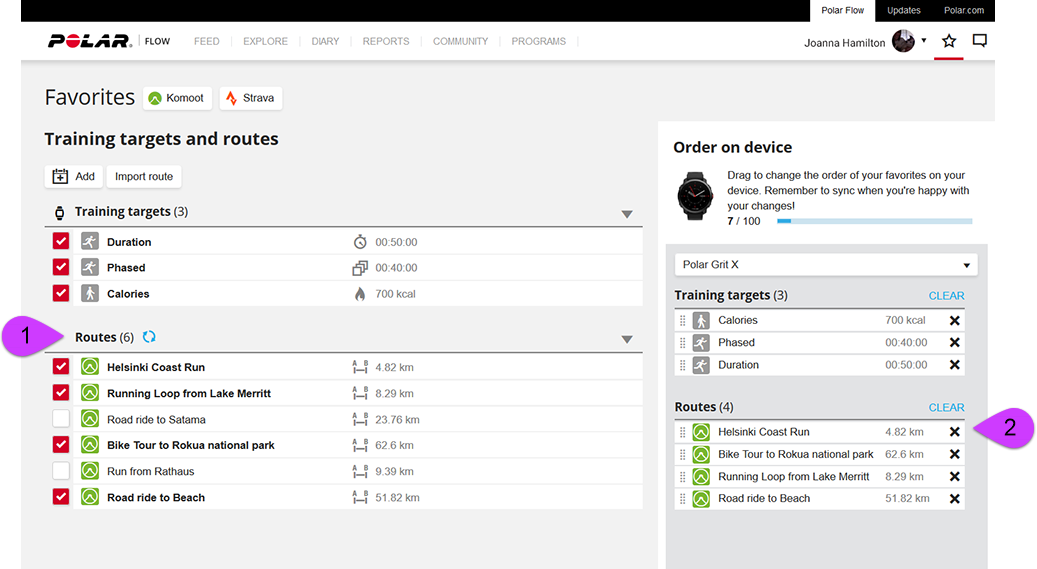
In the Flow web service, click the Favorites icon ![]() on the menu bar on top of the page to enter your Favorites page.
on the menu bar on top of the page to enter your Favorites page.
- Choose the routes by clicking the selection boxes on the left of the routes list to move them to the sync list for your watch on the right. If you have planned new routes with komoot, you can update them to the routes list by clicking the
 Refresh button.
 - You can change the order of the routes on the watch by dragging and dropping them. You can remove individual routes by clicking X or all routes at once by clicking CLEAR. Note that they still remain available in your favorites even if you remove them from your watch.
- Sync your watch with the Polar Flow app to save your changes to it.
For more information on managing your favorites in the Polar Flow web service and app, see Manage favorites and training targets in Polar Flow.
Start a session with a komoot route
- To enter the pre-training mode, press and hold OK in time view or press BACK to enter the main menu and choose Start training.
- Choose the sport profile you want to use.
- Open Routes, and then choose the route you want to follow.
- Add a carbs reminder or drink reminder if you wish, and then choose Start.
- Choose where you want to start the route: Start point, Mid-route, End point to reverse direction or Mid-route to reverse direction.
- Stay in the pre-training mode until the watch has found your heart rate and the GPS satellite signals, and start your session by pressing OK. You may be asked to the calibrate the compass before starting your session. If so, follow the instructions on the display to calibrate it.
- Your watch will guide you to the route. Route start found is displayed when you reach it, and then you're ready to go.
- Your watch guides you through your route with turn-by-turn instructions. Route-end point reached is shown when you're finished.
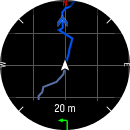
Press OK in the route guidance view to access zoom mode. To zoom in or out, use the UP (+) and DOWN (–) buttons, or pinch the display with your fingers. Press BACK to exit zoom mode.
To open the navigation options from the route guidance view, press the OK button twice. The following options are available:
- Your location: View the coordinates of your current location.
- End route guidance: Stops the current route guidance.
- Reverse route: Reverses the direction of the selected route.
- Routes: Opens the route list, from which you can switch to another route during your session if needed.
- Stop turn-by-turn guidance: Stops the current turn-by-turn guidance.
- Back to start: Turn on the Back to Start (Via beeline) or Track back (Via same route) feature. For more information, see Track back and Back to start.
- Route orientation: Choose North up to display the route with north always at the top of the screen. Choose Track up to display your direction of travel at the top of the screen.
- Compass calibration: Follow the instructions on the display to manually calibrate the compass.
Perform the calibration while wearing the watch on your wrist.