Wear the transmitter to measure heart rate.
Wet the electrode areas of the strap under running water.
In demanding conditions, for instance during long-lasting events, we recommend using conductive electrode lotion or gel to improve contact. It is important to wash the transmitter carefully after using lotion or gel.
Attach the connector to the strap. Adjust the strap to fit tightly but comfortably.
Tie the strap around your chest, just below the chest muscles, and attach the hook to the other end of the strap.
Check that the wet electrode areas are firmly against your skin and that the Polar logo of the connector is in a central and upright position.
Detach the transmitter connector from the strap after every use, to maximize the transmitter battery lifetime. Rinse the strap under running water. See detailed washing instructions in Care and Maintenance.
For a video tutorial, go to http://www.polar.fi/en/support/video_tutorials.
The Polar WearLink transmitter can be used with apparels that have built-in soft textile electrodes. Wet the electrode areas of the apparel. Attach the connector of the transmitter straight onto the apparel without the strap so that the connector’s Polar logo is in an upright position.
Attach the cycling computer to the bike mount and activate it with a long  button press.
In time mode, the cycling computer automatically starts detecting your heart rate.
 | The number on the upper left-hand corner indicates the bike that is in use. The bike you have used during the previous training session is automatically selected. To change the bike, long-press in time mode. |
 | If you have activated the AutoStart function, the cycling computer automatically starts recording the training session when you start cycling. For further information on AutoStart, see Bike Settings. If you have not activated the Autostart function, press to start the recording. |
You can view three lines of training information simultaneously. Press to view the following displays:
|
 | See Training Information for more detailed descriptions of displayed information.
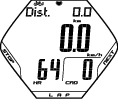
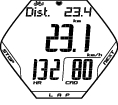
Distance alternating with lap distance (when you have taken at least one lap). Speed Heart rate and Cadence |
 | Average speed Speed Average heart rate and Cadence |
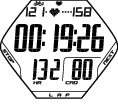
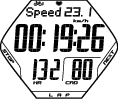 | Speed Stopwatch Heart rate and Cadence |
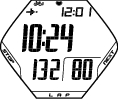 | Arrival time Time of day Heart rate and Cadence |
 | Heart rate limits Time in target zone Heart rate and Cadence |
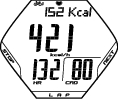 | Calories Calorie expenditure per hour Heart rate and Cadence |
 | Altitude Inclinometer Temperature and Cadence |
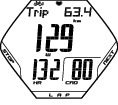 | Trip distance Speed / Power Heart rate and Cadence |
Set the cycling computer to scroll the views automatically by pressing and holding . Turn scrolling off by pressing .
| Information on the display | Description |
|---|---|
|
Altitude |
Current altitude in meters / feet |
Arrival time | By setting the distance you are going to ride, the cycling computer estimates your arrival time to the destination according to your riding speed. For further information, see Cycling Settings. If the riding distance function is off, the speed is displayed instead of arrival time. |
|
Average heart rate |
Your average heart rate of the training session is displayed with an indicator which tells you whether your heart rate is rising or dropping. |
|
Average speed |
Your average riding speed of the training session is displayed with an indicator which tells you whether the speed is rising or dropping (Polar CS speed sensor W.I.N.D. required). |
|
Cadence |
Your pedaling rate in revolutions per minute (Optional Polar CS cadence sensor W.I.N.D. required) |
|
Calories |
The expended calories so far. The cumulation of calories starts when your heart rate is displayed. |
Calorie expenditure per hour |
Rate of calorie expenditure per hour |
Distance |
Distance covered so far (Polar CS speed sensor W.I.N.D. required) |
|
Heart rate |
Your current heart rate |
|
Heart rate limits |
Lower and upper heart rate limit. The heart symbol moves left or right according to your heart rate. If the symbol is not visible, your heart rate is outside the limits. The alarm helps you to stay within the set limits. You can set the alarm off by setting the sound off in General Settings. For more information, see General Settings |
|
Inclinometer |
Uphill / Downhill steepness in percentages and grades. An estimation in numerical form how steep uphill or downhill you are cycling, helping you to adjust cycling effort accordingly. |
Lap distance |
Lap distance (Polar CS speed sensor W.I.N.D. required) |
Power |
Power output expressed in watts (Optional Polar Power Output Sensor W.I.N.D. required) |
|
Speed |
Current speed (Polar CS speed sensor W.I.N.D. required) |
|
Stopwatch |
Total duration of the training session so far |
|
Temperature |
Current temperature |
|
Time in zone |
Time you have trained within the heart rate limits |
|
Time of day |
Time of day |
Trip distance |
Distance between points A and B. Use this function for measuring distance between two points on the route (Polar CS speed sensor™ W.I.N.D. required). Trip distance can be reset in pause mode. |
Take a lap by pressing . The following information is displayed:
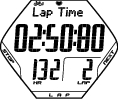 | Lap time indicates elapsed time for one lap. Heart rate / Lap number |
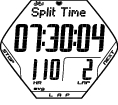 | Split time is elapsed time from the beginning of the training session until storing the latest lap time. Average heart rate (calculated from the beginning of the lap) |
If you have activated the automatic lap function, your cycling computer automatically records laps when you reach the set distance. For further information, see Cycling Settings.
To pause the training session, press .
In pause mode, you can select:
Continue to continue training recording.
Exit to stop recording completely.
Summary for a summary of training information. The following information is displayed:
Exe. Time: Duration of the recorded training session and average heart rate
Limits: Heart rate limits used during the training session (if limits are set)
In zone: Time spent in the target heart rate zone
Kcal/ %Fat: Calories burned during the training session and fat percentage
Speed: Average speed
Cadence: Average cadence
Distance: Ridden distance
Ride Time: Ridden time. For instance, if you stop cycling but do not stop recording the training session, the time counting will automatically stop, but the duration of the training session will continue to accumulate.
If the AutoStart function is active, the training and cycling time are the same, as the cycling computer automatically starts and stops recording as you start and stop cycling.
Power: Average Power
Ascent: Ascended meters / feet
Altitude: Average altitude
Sound to set sounds Off, Soft, Loud or Very loud.
Reset TRIP to reset a distance. Confirm with .
Auto SCROLL to set the computer to scroll the views automatically.
Sensor SEARCH to search for WearLink, Speed, Cadence* and Power* data, if the signal disappears during the training session due to interference.
Press to pause the training session. Continue is displayed.
Press again.
Care for your transmitter after training. Detach the transmitter connector from the strap and rinse the strap under running water after every use. Wash the strap regularly in a washing machine at 40ºC/104ºF at least after every fifth use.
For complete care and maintenance instructions, see Care and Maintenance.
Your cycling computer automatically determines your individual, optimum and safe training intensity zone; your OwnZone. The unique Polar OwnZone defines your personal training zone for aerobic training. The function guides you through a warm up, taking your present physical and mental state into account. For most adults, OwnZone corresponds to about 65-85% of maximum heart rate.
Listening to and interpreting the signals your body sends during physical exertion is an important part of getting fit. Since warm-up routines differ for different types of training, and since your physical and mental state may also vary from day to day (due to stress or illness), using the OwnZone function for every session guarantees the most effective heart rate target zone for that particular type of training and day.
OwnZone can be determined in 1-5 minutes during a warm-up period. The idea is to start training slowly at a light intensity and to gradually increase intensity and heart rate. OwnZone is developed for healthy people. Some health conditions may cause heart rate variability-based OwnZone determination to fail. These conditions include high blood pressure, cardiac arrhythmias, and certain medications.
Before you start determining your OwnZone, make sure that:
Your user settings are correct.
The OwnZone function is activated. See Heart Rate Limit Settings for more information. The cycling computer automatically determines your OwnZone every time you start training if the OwnZone function is on.
Your OwnZone is determined in five stages. If the sounds are on, a beep will indicate the end of each stage.
Wear the transmitter as instructed. Start from time mode and press .
OZ > is displayed and OwnZone determination begins. Cycle or walk at a slow pace for 1 min. Keep your heart rate below 100 bpm/ 50 % HRmax during this first stage.
OZ >> Cycle or walk at a normal pace for 1 min. Slowly increase your heart rate by appr. 10 bpm/ 5% HRmax.
OZ >>> Cycle or walk at a brisk pace for 1 min. Slowly increase your heart rate by appr. 10 bpm/ 5% HRmax.
OZ >>>> Cycle at a brisk pace or jog at a slow pace for 1 min. Slowly increase your heart rate by appr. 10bpm/ 5% HRmax.
OZ >>>>> Cycle or jog at a brisk pace or run for 1 min. Increase your heart rate by appr. 10bpm/ 5% HRmax.
When you hear two consecutive beeps, your OwnZone has been determined.
OwnZone Updated and the heart rate zone are displayed. The zone is displayed in beats per minute (bpm) or as a percentage of maximum heart rate (HR%), depending on your settings.
If OwnZone determination was not successful, your previously determined OwnZone will be used and OwnZone appears with limits on the display. If OwnZone has not previously been determined, age-based limits are automatically used.
You can now continue with your training session. Try to keep inside the given heart rate zone to maximize training benefits. The elapsed time used for OwnZone determination is included in your recorded training time.
Alternatively, to skip OwnZone determination and to use the previously determined OwnZone, press at any phase of the process.
Redetermine your OwnZone:
When changing training environment or training mode.
When training for the first time after a week’s break.
If you have not recovered from the previous training session or if you are not feeling well or are stressed.
After changing user settings.