Route Guidance (Grit X Pro / Grit X2 Pro / Pacer Pro / Vantage V2 / Vantage V3)
The route guidance feature guides you along routes that you have recorded in previous sessions or routes that you've imported into Flow from a third-party service like komoot or Strava for example. You can also import route files directly into Flow in GPX or TCX file format. For more information on importing routes see How to import a route into the Polar Flow Web service and use it on a training device.
Add a route to your watch
To add a route to your watch you must save it as a favorite in the Flow web service or app , and sync it to your watch. For more information see Manage Favorites and training targets in Polar Flow
Route and elevation profiles on Grit X2 Pro / Vantage V3
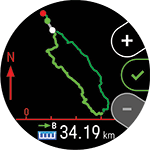
After choosing a route you'll see an overview of the route, and the elevation profile of it. This helps you identify which route is which, and what to expect from your session. Route and elevation profiles are available for planned and unplanned routes but if you want to use a guided route profile you should plan your route first and sync it to your watch.
.png)
Route and elevation profiles on Grit X Pro / Pacer Pro / Vantage V2
After choosing a route you'll see an overview of the route, and the elevation profile of it. This helps you identify which route is which, and what to expect from your session. Route and elevation profiles are available for planned and unplanned routes but if you want to use a guided route profile you should plan your route first and sync it to your watch.

Total ascent and descent for planned routes
When starting a planned route you'll see the total ascent and descent on your route. As you go along the route the ascent/descent values will update and you'll always see the total ascent and descent still left on the route. You'll also see your current ascent/descent grade. At all times you'll know exactly where you are and how much you have left to go. When doing an unplanned route you'll see the ascent and descent for the previous kilometer as well as your current ascent/descent grade.
Start a session with Route guidance
You can choose to go to the route start point, route end point or nearest point on the route (mid-route). First your watch will guide you to your chosen start point on the route. Once on the route, your watch will guide you all the way through and keep you on track. Just follow the guidance on the display. At the bottom of the display you’ll see how much distance you still have left.
- Choose the sport profile you want to use, and in pre-training mode, press the LIGHT button or tap QUICK MENU ICON to enter the quick menu.
- Choose Routes from the list, and then choose the route you want to do.
- Add a carbs reminder or drink reminder if you wish, and then choose Start.
- Choose where you want to start the route: Start point, Mid-route, End point to reverse direction or Mid-route to reverse direction.
- Stay in the pre-training mode until the watch has found your heart rate and the GPS satellite signals, and start your session by pressing OK. You may be asked to the calibrate the compass before starting your session. If so, follow the instructions on the display to calibrate it.
- Your watch will guide you to the route. Route start found is displayed when you reach it, and then you're ready to go.
Route-end point reached is shown when you're finished.
Info on the display (Grit X2 Pro / Vantage V3)
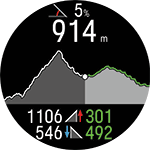
- Current incline/decline grade
- Current elevation
- Ascent and descent on the route (updates as you go along) for planned routes / ascent descent from the last 1 km for unplanned routes
Zoom
In the Map navigation view, press OK to enter the Map navigation menu. Choose Pan and zoom to activate the pan and zoom mode. Use the UP (+) and DOWN (-) buttons to adjust the view, and pan by swiping. Press OK to accept the new zoom level and exit the pan and zoom mode. Your location on the map is centered automatically. Note that if you exit the pan and zoom mode by pressing BACK, the map view will return to the previous zoom level.
Change route on-the-fly
In the Map navigation view, press OK to enter the Map navigation menu. Choose Routes, the watch then asks you Want to change your route?, choose Yes, and choose a route from the list.
For more information, see the Map navigation menu section of the Offline Maps support document.
Info on the display (Grit X Pro / Pacer Pro / Vantage V2)
- Current incline/decline grade
- Current elevation
- Ascent and descent on the route (updates as you go along) for planned routes / ascent descent from the last 1 km for unplanned routes
Zoom
Zoom in or out on your route. Press OK and choose Zoom in/out, and then use the + and - buttons to adjust the route view.
Change route on-the-fly
Switch to a different route during your session.
- Press BACK to pause your session, and press the LIGHT button to enter the Quick menu.
- Choose Routes, the watch then asks you Want to change your route?, choose Yes, and choose a route from the list.
- Choose Start when you're ready.