Using maps during training
During training, offline maps are available as a full-screen map navigation training view. The training view is enabled by default for most outdoor sport profiles and can be added to any sport profile that uses GPS.
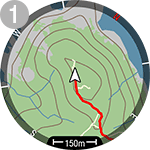
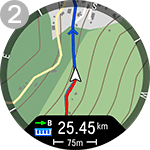
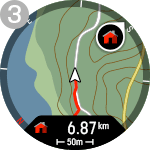
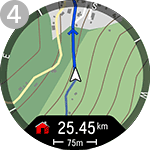
After starting your session, scroll to the map navigation training view with the UP/DOWN buttons. You can use the map either on its own (1) or with other navigation features, including Route Guidance (2), Back to Start (3), Track back (4) and Points of Interest (5).
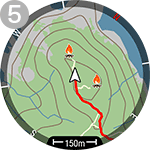
In the map navigation training view,
- the location pointer
 displays your current location and heading. If heading information is not available, your location is indicated with a blue dot
  . Calibrate the compass via the map navigation menu to show your location with heading.
 - breadcrumbs appear as a red line, showing the path you have taken so far.
- the blue line shows the route you have chosen for the training session, and arrows along the route indicate the direction of the route.
- the four cardinal directions shown around the map help you navigate.
- the map scale helps you identify the distance between places.
Map zooming
Press OK in the map navigation view to access the zoom mode. To zoom in or out, use the UP (+) and DOWN (–) buttons, or pinch with your fingers. You can move around the map by swiping. Press BACK to exit zoom mode. Your location on the map is centered automatically.
Map navigation menu
To open the map navigation menu, press OK in zoom mode, or press OK twice in the map navigation view. The menu then displays the following options.
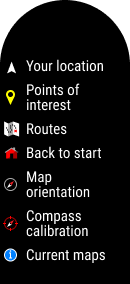
- Your location: View the coordinates of your current location.
- Points of interest: Choose Set point on map, Choose from list or Choose shown POIs. For more information, see Points of interest.
- In Routes, you'll find the routes that you have saved as favorites in the analysis view of your training session in the Flow web service, and synced to your watch with the Polar Flow app. Komoot routes are also found here. To begin, choose the route from the list, and then choose where you want to start the route: Start point (original direction), Mid-route (original direction), End point to reverse direction or Mid-route to reverse direction.
After choosing a route, the following options appear in the map navigation menu:
- End route guidance: Stops the current route guidance.
- Reverse route: Reverses the direction of the selected route.
- Routes: Opens the route list, from which you can switch to another route during your session if needed.
- Start turn-by-turn guidance: Activates turn-by-turn guidance for the current route. The watch provides instructions through sound and vibration alerts and shows which way to turn. Turn-by-turn guidance is enabled by default for Komoot routes. When turn-by-turn guidance is active, the option Stop turn-by-turn guidance appears in the menu.
For more information, see Route Guidance.
- Back to start: Turn on the Back to Start (Via beeline) or Track back (Via same route) feature. For more information, see Track back and Back to start.
- Map orientation: Choose North up to display the map with north always at the top of the screen. Choose Track up to display your direction of travel at the top of the screen. When your direction changes, the map rotates accordingly.
- Map theme: Choose Light or Dark theme for the map.
- Compass calibration: Follow the instructions on the display to manually calibrate the compass.
Perform the calibration while wearing the watch on your wrist.
- Current maps: View current maps and check the space used. You can also change the map or set it to be chosen automatically based on your location.