Wear the transmitter to measure heart rate.
Detach the connector from the strap when you are not using it to maximize the transmitter battery lifetime. Sweat and moisture may keep the electrodes wet and the transmitter activated. This will reduce battery life. |
|
See detailed washing instructions in 13. Important Information.
For video tutorials, go to http://www.polar.fi/en/support/video_tutorials.
↑ Back to topWear the transmitter and make sure you have set up an optional sensor* as instructed in the sensor's user manual. If you are using a speed, cadence, GPS or stride sensor for the first time, see 11. Using a New Accessory. For sport profile settings see Sport Profile Settings. To use Polar ZoneOptimizer feature for your training session, see Train With Polar ZoneOptimizer.
 |
|
 |
|
 |
|
 |
|
*Optional sensors include Polar s3+ stride sensor, Polar G3/G5 GPS sensor, Polar CS speed sensor W.I.N.D. or Polar CS cadence sensor W.I.N.D.
Change sport during training session
If your training session includes different types of sports, you can change the sport without stopping the training recording.
Press once, Recording paused is displayed.
Change the sport by scrolling with buttons and select the desired sport. Press to continue the training recording.
You can view four lines of training information simultaneously. Press to view the different displays.
For more information on modifying training views, see Sport Profile Settings.
The ZoneOptimizer function determines your personal, optimized sport zones (heart rate zones) for your aerobic training session. It takes your present physical condition and mental state into account when determining the heart rate zones for the present training session. You will know what the right level to train on that particular day is, and can avoid over/under training. For more information, see Polar ZoneOptimizer.
To use the ZoneOptimizer function in your training, set in on by selecting MENU > Settings > Heart rate settings > ZoneOptimizer > On .
ZoneOptimizer function will define the optimized target heart rate zones for you in the beginning of every training session. If there is less than an hour since your last ZoneOptimizer definition, the given target heart rate zones are not necessarily valid, because you may have not recovered from previous training, and during instant recovery, heart rate variability returns to normal state slower than heart rate.
Before ZoneOptimizer determination, make sure that you have the Polar default sport zone heart rate limits in use i.e. you have not modified the heart rate limits manually. If you want to modify the Sport Zone heart rate limits manually, set the ZoneOptimizer function off.
To set the ZoneOptimizer function on, select MENU > Settings > Heart rate settings > ZoneOptimizer > On.
The ZoneOptimizer determination will start in the background already when you are in pre-training mode. When you see the ECG-curve on the top right hand corner on the display, you will know that the heart rate measurement and ZoneOptimizer are on.
 |
|
 |
|
 |
If you have a very low HRmax, the training computer will give you special limits. The alarm will sound when the second part of the ZoneOptimizer determination is finished. The ZoneOptimizer determination may already finish here, if the heart rate variation limit is reached . |
 |
|
 |
|
Download Polar Endurance program from polarpersonaltrainer.com, and have a ready made program to guide you in your training.
To be able to download the program you need an account in the polarpersonaltrainer.com, the DataLink data transfer unit and WebSync software. For more information, see polarpersonaltrainer.com Help.
Once you have downloaded the program onto to your training computer, go to MENU > PROGRAM and press . You can browse through the planned training sessions with buttons and select the training session you want to do (for example Thu 26.8.Long run 20km). To start training press .
↑ Back to topBefore commencing a multisport training session, make sure that you have set the sport profile settings for each of the sports that you are going to use for the training session. For more information, see Sport Profile Settings.
During a mulstisport training session it is easy to change sports without stopping the training recording. During training recording press once, and select another sport by browsing with button and confirm your selection by pressing . Then continue with your training session.
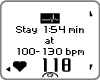
↑ Back to topTo set Race pace on for the training session go to MENU > APPLICATIONS > Running > Set race pace xx:xx:xx MIN/KM or MIN/MI. First set the distance and then the time in hours, minutes and seconds. Race pace set to xx:xx MIN/KM is displayed.
When starting the training session with Race pace go to MENU > APPLICATIONS > Running > Start session with race pace. Race pace set to xx:xx MIN/KM is displayed. You can now start your training session.
 | Race pace during training Running man: Tells if you are ahead or behind the target pace. -0:35 : Time behind (-) / ahead (+) 5:05min/km: pace needed to achieve the target. 20:9 km: Distance left to reach the target. Current speed Current heart rate |
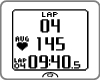 | Press to record a lap. The display will show: Lap number Average heart rate of the lap Lap time |
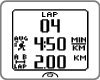 | If a speed sensor is activated, the following will also appear: Lap number Average speed/pace of the lap Lap distance |
When training without preset target zones, you can lock your heart rate to the current sport zone. This way, if you did not preset target zones before starting the training, you can do it on-the-go during a session.
To lock/unlock the zone, press and hold .
During programmed training sessions: Press and hold and select Lock zone/Unlock zone from the Lap menu.
If, for example, you are running with a heart rate of 130 bpm which is 75% of your maximum heart rate, and matches sport zone 3, you can press and hold OK to lock your heart rate into this zone. Sport zone3 Locked 70%-79% is displayed. An alarm sounds if you are below or above the sport zone (if the target zone alarm function is on). Unlock the sport zone by pressing and holding again: Sport zone3 Unlocked is displayed.
Using the software, you can also base ZoneLock on your speed/pace or cadence*. For further information, see software help.
*Optional sensor required.
Each training view can have four rows of information shown during training. It is possible to zoom the upper row or bottom row information.
To zoom the upper row information during training press and hold . To cancel the upper row zoom, press and hold .
If you zoom the upper row or bottom row, the display will show three rows of information.
To zoom the bottom row information during training, press and hold . To cancel the bottom row zoom, press and hold .
If you zoom both upper row and bottom row, the display will show two rows of information.

HeartTouch function makes it easy for you to view certain information during training by bringing the wrist unit near the transmitter. You can select the function to
activate backlight.
change training view.
show limits.
show time of day.
take a lap.
Please note that HeartTouch function only works with Polar WearLink®+ Hybrid transmitter.
For more information, on the HeartTouch settings see Sport Profile Settings.
There is a night mode function in RCX5 training computer. Press the button once during pre-training mode, training recording mode or pause mode. The backlight will be activated every time you press any of the buttons, or use the HeartTouch function during training recording.
The night mode will be switched off when you finish the training recording and the return to Time mode.
The display will also light up if a message, for example, Check heart rate transmitter, is displayed.
Night mode is switched off, when you finish the training recording and the display returns to time mode.
Press and hold . QUICK MENU is displayed. You can change certain settings without pausing the training recording. For further information, see Quick menu.
Pause training recording by pressing , Recording paused is displayed.
In pause mode you can:
Continue: Continue training recording by pressing .
Stop training recording by pressing .
Personalize your training computer display to show the information you want to see during training, either by using the training computer or the WebSync software. A programmed training session downloaded from the software and a training view have their own displays that cannot be modified.
In time mode press , select Settings > > Sport (Running, Cycling, Swimming, Other sport) > Set training views.
You can also personalize the training views in pre-training mode by long pressing the button . You enter QUICK MENU, select Running settings (current sport settings) > Set training views.
There are six different training views which you can personalize for each of the sport profiles.
Select the display you want to change by pressing or , and press .
Select the training view Off, On or Modify.
Select the information for the blinking upper row with or , and press . The information available depends on the features that are activated. Repeat the same to change rest of the rows.
To return the default settings of the display, press and hold when the rows are blinking. For further information on changing the training views, see Sport Profile Settings .
| Information on the display | Symbol | Explanation |
|---|---|---|
| Time of day |  | Time of day |
| Countd. timer |  | Countdown timer |
| Stopwatch |  | Total duration of the training session so far |
Lap time |  | Time used for the lap. |
| Average heart rate |  | Average heart rate of the training session so far. |
| Calories |  | Expended calories |
Calories/ hour |  | Expended calories per hour |
Heart rate |  | Current heart rate |
Zone pointer (Polar sport zones) |  | Target zone indicator with a heart symbol that moves left or right on the sport zone scale according to your heart rate. For further information on setting a sport zone, see Sport Profile Settings. |
| Information on the display (Polar s3+ sensor required) | Symbol | Explanation |
|---|---|---|
Cadence |  | Running cadence (pair of steps per minute) |
Avg Cadence |  | The average running cadence so far (pair of steps per minute) |
| Speed |  | Current speed/pace |
Distance |  | Distance covered so far |
Lap distance |  | Lap number and lap distance |
Average speed |  | Average speed/pace so far |
| Max speed |  | Maximum speed/pace so far |
Trip |  | Trip distance |
| Information on the display (Polar G3/G5 GPS sensor required) | Symbol | Explanation |
|---|---|---|
| Speed |  | Current speed/pace. The amount of bars above the letter G indicates the GPS signal strength. |
Distance | | Distance covered so far |
Lap distance | | Lap distance |
Average speed | | Average speed/pace so far |
| Max speed |  | Maximum speed/pace so far |
Trip | | Trip distance |
| Information on the display (Polar speed sensor required) | Symbol | Explanation |
|---|---|---|
| Speed |  | Speed you are currently cycling at |
Distance | | Distance cycled |
| Lap distance* | | Lap number and lap distance |
Avg speed |  | The average speed so far. |
| Max speed |  | The maximum speed so far. |
| Information on the display (Polar cadence sensor required) | Symbol | Explanation |
|---|---|---|
| Cadence | | Measures the speed at which you turn the cranks of your bicycle (i.e. cadence), in revolutions per minute (rpm). |
| Avg Cadence | | The average cadence. |
Training reminder reminds you to drink, eat or take other important actions during training.
Reminder is based on energy consumption (kcal), distance (km) or time. Reminder alarms when certain calories, distance or time has been reached during training. When reminder alarms, reminder counter is reset. This means reminder alarms regularly (for example if reminder is set for 300 kcal, reminder alarms when 300kcal, 600kcal, 900kcal... are consumed). To exit the reminder message on the display, press any button except .
You can create the reminder text in WebSync software and download it to the training computer with DataLink data transfer unit. The text is shown when the reminder alarms. The reminder can only be set in the software but it can be switched off in the monitor.
↑ Back to topTo pause training recording, press once. To change the sport, browse the sport profiles with buttons and select the sport you want to use next. To continue training recording press .
To stop recording completely, press twice.
Care for your transmitter after training. Detach the transmitter connector from the strap and rinse the strap under running water after every use. Wash the strap regularly in a washing machine at 40ºC/104ºF at least after every fifth use. For complete care and maintenance instructions, see Caring for Your Product.